> For the complete documentation index, see [llms.txt](https://docs.fringetheatre.ca/llms.txt). Markdown versions of documentation pages are available by appending `.md` to page URLs; this page is available as [Markdown](https://docs.fringetheatre.ca/wordpress/introduction-to-wordpress/pages.md).
# Pages
Pages are places that contain everything from courses to forms. This section is regarding non-course pages.
## Adding Pages
To add a new page,
1. Navigate to **Pages**.
2. Select **Add New**.
3. Enter your content.
4. Save your work by either saving a draft or publishing.
### Titles vs. Permalinks
When you create a new post or page, WordPress automatically creates a permalink (sometimes called a ‘slug’) based on the title.
Once WordPress has generated that permalink, it will stay the same unless you choose to edit it later. This means you can have a page or post title that’s different from the permalink wherever appropriate.
### Saving Your Work
At the top of the right of the screen for all new or in progress pages and posts, you will see three options: [**Save Draft**](#save-draft), [**Preview**](#preview), and [**Publish**](#publish).
#### Save Draft
The **Save Draft** button at the upper left will save your new content but will not publish it to the site. It is particularly useful when you need to add many things before you’re ready to publish and want to save as you go, or when you need to start a post and come back to it later.
#### Preview
The **Preview** button at the upper right will open a new browser tab showing you what your page would look like if you published it. This is great for testing how text formatting or images would look in your post before you commit to publishing it.
#### Publish
The blue **Publish** button saves your new content and makes it visible to visitors of your website. Use this button once you’re ready to show your new content to the world.
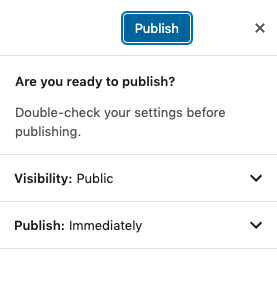
When you hit **Publish**, you will be given a set of options:
Page publish options.
Visibility gives you three options:
* Public: This is the default and publishes your page live to your site.
* Private: This can be used if you want to share a page only to those with admin access
* Password protected: This allows you to protect a page with a password.
Publish gives you the option to change the publish date/time of your post. It will default to immediately, but you can also retroactively publish a page (i.e., set the publish date to the past). Or you can schedule the page to publish in the future. This can be useful for preparing content ahead of time that shouldn’t be released until later.
Once you have your preferred settings, click the blue **Publish** button above the publishing settings.
After you select **Publish** for the first time, this button will change to **Update**.
{% hint style="info" %}
If you click **Publish** before you’re ready, you can fix it! **Switch to draft** should now appear as an option where **Save Draft** was originally.
{% endhint %}
### Templates
Page templates can be set in the **Document** sidebar on pages. You will never need to change this.
Page Template box.
{% hint style="info" %}
When creating any new pages, please leave it set to the **Default template**. It will give you the most flexibility when creating pages.
{% endhint %}
### Setting a Parent Page
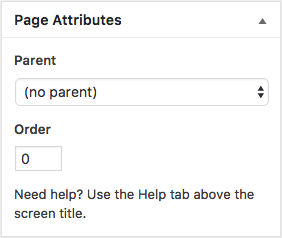
Some pages could have a Parent Page set in the **Page Attributes** box within the **Document** sidebar.
Page Attributes box.
Setting a Parent Page allows you to group pages together under a single ‘top-level’ page to organize your website. This usually corresponds to how you want the page to appear in the website’s navigation menu.
To set a Parent Page, select the appropriate page from the **Parent** drop menu. If you do not, your page will default to having no parent, which means it will be treated as a ‘top level’ page.